Showing posts with label social media. Show all posts

30 June 2018

It's okay to leave people on 'read'

It's okay to leave people on 'read'

My phone is pretty much permanently glued to my side in 2018. From scrolling through Insta to chatting on Whatsapp to hunting down the best memes on twitter, I am obsessed. But, being so clingy to my phone means there's a total expectation that you can reply to messages instantly; so what happens when your mental health means you can't?

26 March 2017

Why I'll Never Get Back Into Tumblr

Why I'll Never Get Back Into Tumblr. Nourish ME: www.nourishmeblog.co.uk


I love the internet, and I love social media even more. But let's face it, there are some really dark corners of the 'net out there. Social media for me now is a place to share things I love; quick snaps of yummy things I've baked on Instagram, blog posts I've poured my heart into on Facebook, and snippets of what's making me feel good on Twitter. However, it wasn't always like that. Twitter used to be a place for me to vent, a place I'd go to and angrily scrawl song lyrics into a tweet. And the only other platform I really used was tumblr.

Before I really got into the platform, I was warned against it by some of my closest friends. All three of us suffered with self harm and depression, and they told me that it'd be a mistake. I promised I wouldn't look into the 'dark side' of tumblr. I lied. It's a site where there's no real kind of monitoring. If I see someone tweeting #thinspo pictures, or Instagramming self harm, I can report them, or block them and it'll go away. But with tumblr? There's no real protection, especially if part of you doesn't want protecting.

I really wanted to go with a black and white 'theme'. I wanted to follow accounts that reblogged pictures with emotive quotes about mental health issues. I wanted to be in the 'community' of people on tumblr who suffered with self harm, in the hope of connecting with people that felt the way I did. Although in some respects I got what I wanted, I also got a whole lot that I didn't.

My dash(board) was now full of images and gifs that summed up the way I was feeling. But, interspersed with them were things I didn't need to see: thinspo accounts with seriously underweight girls calling themselves fat, words cut into people's skin to define what they hated about themselves, and more. This isn't what I came to tumblr for, but it's what I got wrapped up in.

It's almost a kind of competition over there. People regularly post  pictures of their self-harm, which is always going to make you compare yours to theirs. I know that mine got a lot worse because of these images: clearly I wasn't doing enough damage to have a 'problem'. Then there's a whole corner of the site where you have people counting down their weight, and posting pictures of them getting thinner and thinner. It's a dangerous place to be. A really dangerous place to be. If there's one site that I wish could be banned, purely for the easy access it gives teens to images or texts posts like these, it would be tumblr. 

And yes, obviously not everyone uses it for these purposes. For some it's a place to get politically inspired, for others it's a place to visit 'for the aesthetic'. But for a lot of people, it's a deep, dark and terrifying place. 

What do you think of the site?

Follow me on Bloglovin | Twitter | Instagram | Youtube | Facebook

21 February 2017

How to host a Twitter giveaway

How to host a Twitter Giveaway. Nourish ME: www.nourishmeblog.co.uk
I feel like the days of doing a cheeky ol' Rafflecopter on the blog and asking people to follow you on every single platform and put in all of their details are dying a little bit. Now, Twitter and Insta giveaways are taking over. You just have to click a couple of buttons and BOOM, no fuss, no fiddling, you've entered. I for one find them so much simpler and more tempting to get involved in.

12 May 2016

Beginner's Guide: Using Pinterest

Beginner's Guide to using Pinterest for bloggers - by Nourish ME www.nourishmeblog.co.ukBeginner's Guide to using Pinterest for bloggers - by Nourish ME www.nourishmeblog.co.uk


Beginner's Guide to using Pinterest for bloggers - by Nourish ME www.nourishmeblog.co.uk

I was a teensy bit late to the Pinterest game, I'm not going to lie, But once I got here about a month and a half ago, I found it really damn hard to find any blogger advice on how to use Pinterest. After a shaky first week or so I eventually found some interesting pieces of advice, ironically, on Pinterest, about how to use it, and how to optimise my use of it for the blog. So, I've gathered my top tips for those of you who have never used Pinterest, or still don't *really* know how to get to grips with it. In the first few weeks I did consider giving up on it - it seemed like wayyyy too much effort to keep up with whilst I had no clue what was going on. But now that I know more, I've totally fallen in love with it and I'm pretty much 100% obsessed. I've learnt masses about blogging, found new countries and cities to fall in love with, and created tonnes of recipes from it!

Getting Started

The first thing you need to do is (obviously) set up an account. You need to choose a name, and, like choosing one on any kind of social media, this is pretty important. I've gone with Stephanie | Nourish ME as I wanted it to represent my blog and include a little bit of my own self too. I would definitely recommend considering using your blog name somewhere in your Pinterest name as it ensures that you carry your brand across to that social media platform. Alongside a name, you'll also need a short bio. This should contain some of your interests so that people will know what kind of things they can expect to see you pinning as well as a little bit of information about your blog. Mine looks like this: "UK based health, lifestyle, fashion and beauty blogger. All round foodie and lover of developing new recipes". I'm still tweaking it, but this basically summarises most of my blog post topics and my main hobby (FOOD haha). A final part of your setup is to connect your Pinterest with your blog domain or blog address. You simply add this in, and once you've verified that it's yours, it will appear as a link on your Pinterest. This way you can drive traffic straight from your Pinterest account to your blog every time someone finds your account.

Following Accounts

At first Pinterest will do the standard social media thing of getting you to pick areas of interest (yayyyy, can we not just skip this already). So once you've sorted out your five or so things that you would like to hear about, you can get down to the real nitty gritty of finding what you want to see on Pinterest. I did a little call out on Twitter to discover some blogger friends who were on here to start, but my main sourcing of followers came from finding Dork Face Blog's Pinterest. I absolutely LOVE Jemma's style and enthusiasm for all things colourful and pretty, so I decided to follow a fair few people she followed - if they were good enough for her then I was sure to fall in love with their pins, right?! After following a few of those lovely bloggers, I then basically searched key terms like 'baking', 'lifestyle', 'blogger', lifestyle blogger', 'food', 'recipes', 'travel blogger' and so on. For the first few weeks I followed 20 people a day and this seems to have really helped in terms of securing a decent following so far!

Dealing with your feed

Okay, this one had me really stumped at the beginning. I was mindlessly staring at the screen with 'what is a pin?' and 'how do I even pin things?' and 'good lord, what is this dashboard thing and how do I control it?!'. Basically, if you've ever used Tumblr (hello my 17-year-old obsession), then getting to grips with Pinterest is going to be a LOT easier for you! Basically your dashboard is where everything that people you follow have pinned or repinned will appear. You can click on any picture on your dashboard and it will enlarge. If you click again you will be taken to the website that the post originally appeared on (hopefully - occasionally you get taken to a different page than what the image suggests, argh). Once you click back onto Pinterest you then have the option to either 'x' out of the enlarged image, or pin it to one of your boards. 

Pinterest Boards

So, you've decided to pin something and now you're faced with 'choosing a board', say whaaaat?! This had me a teensy bit baffled, to say the least, at first. A board is basically a category to put your pins into. Mine range from baking, to yoga, to blogging inspiration, to cocktail recipes, with about 20 more in between. Having a whole range of Pinterest boards makes it easy for me to find an article or recipe quickly without having to trawl through hundreds of irrelevant pins. When you save a pin you get to choose to put it in an already existing board, or create a new one. This is one of my favourite aspects of Pinterest, as it makes creating new boards really easy and convenient. 

The way you organise your boards is also pretty important. Pinterest simply places them in the order in which you created them, but it's really easy to move them around. To get the greatest number of hits on your blog, it's best to have it in your top row as you can see that I've done in the pictures above. In that row should also be the boards you're most proud of, and ones that you think will draw people to your Pinterest. I've got my Happiness, Travel Bucket List and Home Inspo boards up there alongside the Nourish ME one. 

Making your Blog Pinterest-able

So, once you've got everything set up you really need to make sure that you can actually use your blog posts on Pinterest, and that other people can too. The first thing you really need to do is install a hover pin button to put over your photos. That way people can simply click and add the post via the photo to their board. Then, you need to create an 'alt tag' for each picture that sums up the post. On blogger you do this by clicking on your image, then clicking on 'properties' and adding text in to both boxes. For example, my ones for this post are 'Beginner's Guide to using Pinterest for bloggers - by Nourish ME www.nourishmeblog.co.uk'. This is the summary people will see underneath your image on Pinterest. Finally, when you publish a post pin it yourself so that hopefully people will see it and repin!


I know that was a massively long post, so kudos to you if you're still here! If you've got any more questions, comment below or tweet me @stephhartley4.

Follow me on Bloglovin | Twitter | Instagram | Facebook | Youtube | Pinterest 


29 April 2016

10 Ways to Improve Your Blog Today

10 easy ways to improve your blog today - gain followers, improve page views and more! Nourish ME - www.nourishmeblog.co.uk

I'm always looking for something I can do to tweak my blog so that it becomes more appealing to readers, contains better content and eventually will start making a little profit (all about that side hustle). Over the past month or two I've been doing this almost daily, and I'm finally starting to see the results I've been wanting for months and months. With blogging I definitely think that 'you get what you give' in terms of giving time and getting results. But, there are some things that you could kick start today to up your blogging game in ways that you might not even have considered. Here's my guide to 10 things you can do, or start doing, today to finally see the results you've been wishing and dreaming for.

Get your own domain

I've actually only recently just done this - no longer is Nourish ME living at http://nourishmeclean.blogspot.com, but instead it has moved to www.nourishmeblog.co.uk. There are a whole host of benefits to this, but the main one is that brands and PRs will take you a lot more seriously if you have your own domain. Some brands won't even agree to a collaboration, let alone any payment if you don't have this. 

Another benefit is that you can rename your webpage without having to make an entirely new website. I was pretty sick of my blog being called 'nourishmeclean' in the URL - originally Nourish ME was all about clean eating and creating healthy recipes, but as it's evolved to what it is today this name seems a little odd and really irrelevant. I'm now a LOT happier with 'nourishmeblog' as I feel like it summarises my blog a little better. I bought mine from GoDaddy for 0.99p for owning the domain for one year. There are other packages you can buy that offer you more protection - in the end I think I paid about £8 for the year. 

Make sure your blog design fits your brand

This is going to be the most expensive thing on this list by FAR, but it really is important. Have you ever clicked on a blog and decided that you just can't deal with the overload of colour or poorly organised layout and left without following? I definitely have. I'm a bit rubbish with anything beyond seriously basic html, so my blog was designed by Jen from Magic Feather Designs. She was really sweet and did everything exactly as I wanted to almost a year ago, and has been really helpful as I consider updating it at the moment. I wanted bright, fresh colours to match my theme of enhancing your mental and physical wellness, which is why I went for the blue and yellow. 

Optimise the size of your images

The irony of this is that this is the first blog post in about six months that I haven't done this with (her's me choosing pinterest over blogger - #sorrynotsorry). On blogger the optimum picture size is about 650 pixels wide. This allows your photos to remain as wide as each other and your text, meaning that the whole blog post appears to be coherent and well organised when you first view it. However, each social media platform has its own optimum image size, so it's best to have at least a few height varieties, or keep separate photos that aren't on the post for promoting your blog post on social media. Canva is my go-to for making photos specifically for social media, as they have templates for pretty much any social media platform you might want to post to. 

Have a blog brand focused social media account on all main platforms

Sorry for the massive jumble of words here! What I basically mean is ensure you have a Twitter, Instagram and Pinterest account and a Facebook page that is not something personal that you use to rant on (been there, done that), but something that is focused on your brand. I recently went through a mini social media rebrand by making sure all of my accounts have the words 'Nourish ME' at least somewhere in the handle or name and I've noticed a much better response in terms of following since I've sorted this. By doing this you make sure that your followers know what brand you're affiliated with immediately, so they're more likely to follow you. This also allows you to tweak the content you share on each platform so that it is brand focused, but not sterile or pointless. For example, my twitter is my most personal social media; because I write so many tweets daily I post links to blog posts three or four times a day on there and this doesn't overwhelm my followers. On my Facebook page however I only post something if I've written a new blog post, or if I want to share relevant posts from other users on Facebook. My instagram is different again. I post once or twice a day, but use this more for general life updates, with the odd picture for a blogpost. And finally we have Pinterest (aka my new love), which I make sure I pop on at least once a day to gain some foodie inspiration and make sure I'm putting my blog posts out there.

Enhance the quality of your images

If you're a veteran blogger, then this is pretty much blogging 101 - a picture is, after all, worth 1000 words. BUT, I know that for well over a year I considered a semi alright picture with no attention to the background or editing something that was appropriate for my blog and would draw readers in. Now almost all of my photos are taken on my camera (a Canon 1200D). I'm not suggesting you need expensive equipment, but definitely use the highest quality piece you have. Another really important thing to do is to make sure you have an appropriate background. A lot of blogger opt for white, marble or single toned backgrounds; this ensures that your readers are drawn to the real content of your image, and aren't distracted by a background. Once you've actually got the picture, editing really is important. I use PicMonkey to improve the brightness and contrast of pictures, crop out anything unwanted from the background and add text when relevant. 

Make your blog post titles appealing and SEO friendly

This is one that up until recently I've been seriously guilty of not doing, and since I've started focusing on improving my blog post titles I've noticed that they've been getting waaaay more hits. Statistics show that there are certain title templates that really work for drawing in readers. Ones containing numbers (like my 10 things we can all learn from Disney's Zootropolis) and ones starting with 'how to' or 'ways to' are statistically proven to draw many more readers in than titles without these attributes. Obviously you wouldn't want to do this all the time, but for example, '75 blog post ideas for when you're low on inspiration' is a much more appealing title than 'Ideas for blog posts when you have no inspiration' - I know which one I would click on. Also, using straightforward titles may seem boring, but helps you greatly in terms of SEO. If you're reviewing something let your readers know, and don't write a prosaic title that has little to do with the actual content. 

Have a media kit set up and available to view on your site

I've got a whole blog post dedicated to making your own media kit. A lot of brands and PRs will ask for one if you want to collaborate with them, plus it means that readers can have a brief perusal of your stats and see what your blog's about all in one place. 

Start being social on social media

This sounds really obvious, but since I've started interacting with other bloggers, particularly on twitter (blogger chats are fab for helping you out with this), I've learnt so many things and met some really lovely bloggers. If you don't interact with anyone, follow other bloggers or check out their blogs why should you expect them to do that for you?

Get organised with spreadsheets

Jess from The Indigo Hours has an amazing post on this here which is what inspired me to start using excel spreadsheets in the first place. My spreadsheet currently has pages for April, May and June blog posts (yes I am now that organised), monthly stats and a record of any brand collaborations I am planning on undertaking. I love being able to just pop a new blog post idea down when it comes to mind, and colour coding the posts on themes (fashion, lifestyle, food, etc) means I can make sure that I don't write too many similar posts in a row. 

Update old posts

This is next the next big project on my blogging to-do list, and soon I'm probably going to start updating at least 5 a week. You know earlier I mentioned my awful photography skills and not brilliant content? Well those posts are still sitting around waiting for people to read them. I'm (eventually) going to revisit them all, alter the images, improve the content, possibly change the post title and ensure that none of my links are broken. So, when people go rooting around on my blog, or I want to talk about an old post, this can happen without me dying a little inside.


What would you add to the list? I hope this was helpful!


26 April 2016

Vegan Pear and Raspberry Oatmeal Recipe

Vegan Pear and Raspberry Oatmeal Recipe from Nourish ME - www.nourishmeblog.co.uk
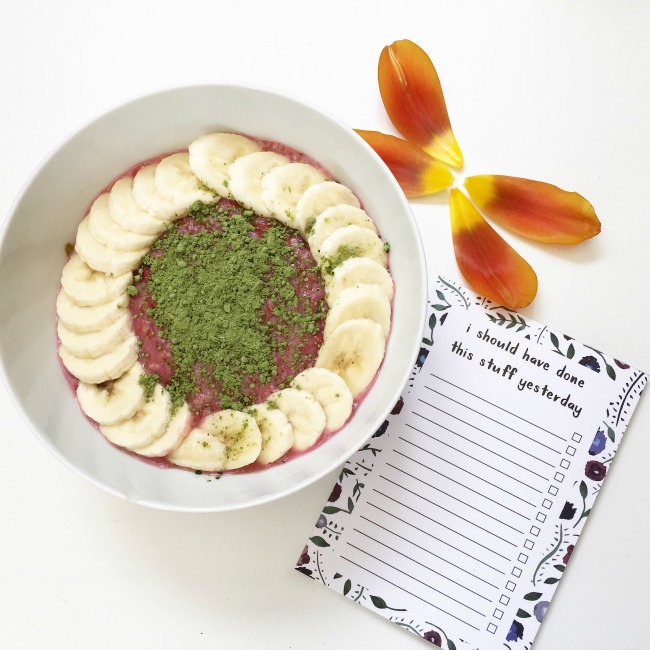
Vegan Pear and Raspberry Oatmeal Recipe from Nourish ME - www.nourishmeblog.co.uk
It feels like FOREVER since I've shared a recipe with you guys. The last one I posted was my homemade orange juice recipe waaaay back in December! I've been obsessed with Pinterest recently (follow me here) and it's inspired me to get back in touch with the roots of Nourish ME. If you've followed me since Nourish ME was a wee un-SEO'd, disorganised, poor picture quality baby, then you'll know that originally this was solely a recipe website for me to share all of my creations with you guys. Since then it's expanded into a more lifestyle orientated blog with a bit of beauty, fashion and foodie content thrown in. 

 So, I've decided to share my favourite breakfast of all time with you. I fell in love with Deliciously Ella's blueberry and apple oatmeal recipe - it was totally my go-to Winter breakfast - and I created this one as a yummy alternative to add a bit of variety to my mornings. Although Spring has sprung it seems to have pretty much disappeared here in the UK - it snowed (snew???) today and was so cold I'm pretty sure my baby finger has frostbite from cycling to work this morning. 

If you want to add normal milk instead of a vegan alternative then this recipe will definitely work with that too. Also, the majority of the ingredients for this easy four-ingredient recipe can be bought organic, so doing that will increase the nutritional quality of the dish, but will obviously make it more expensive.

I'm a pretty big fan of all things Instagram, so I'm always looking for ways to optimize my food photography. With the pictures in this post I've added my Beyonce wall art from Coconut Lane (you can get 20% off with the code 'nourishme20') and my That Lame Company list pad. I love adding a touch of stationary to my food pictures because I am a serious stationary obsessive and they add a depth to the photo. This recipe is pretty great for sharing on Instagram or other social media because it's super easy to create and makes you look like a top-notch foodie. 

In terms of topping the oatmeal to make it Instagram-worthy, I usually thinly slice a banana and arrange that on top, then add a few flax seeds, chia seeds and sometimes even a teaspoon of wheatgrass powder for that extra boost.

Pear and raspberry oatmeal (Serves 1)


Ingredients

1 pear
100g raspberries
40g porridge oats
200ml rice milk (or any other milk alternative)

Method

- Place the raspberries in a pan with just enough water to coat them. Allow to simmer for ten minutes.

- Whilst this is cooking, grate the pear into a bowl and add the rice milk and oats. Leave to soak for a couple of minutes.

- Cook the porridge mixture in a pan for 2-3 minutes until thoroughly heated. 

- Add the raspberry mixture (should look like a compote with a few whole raspberries or parts of raspberries remaining) to the porridge. Mix and serve. 

What is your go-to breakfast at the moment?

17 April 2016

100 Instagram Post Ideas

100 Instagram ideas for food bloggers, fashion bloggers, beauty bloggers and lifestyle bloggers from Nourish ME - www.nourishmeblog.co.uk

100 Instagram ideas for food bloggers, fashion bloggers, beauty bloggers and lifestyle bloggers from Nourish ME - www.nourishmeblog.co.uk

Foodie posts:

1.) A fruit-topped smoothie bowl

2.) A fruit platter

3.) A homemade curry

4.) A pancake stack

5.) A mezze board

6.) Homemade nachos

7.) Your latest baking experiment

8.) Homemade juice

9.) Your favourite family recipe

10.) Fruit parfait in a jar

11.) Nicecream (vegan banana ice cream)

12.) Detox water

13.) Oatmeal recipe

13.) Fruit salad

14.) Fruit kebabs

15.) Homemade soup

16.) Milkshake

17.) Cocktails

18.) Meal out at a restaurant

19.) Homemade sushi

20.) Hot chocolate

21.) Homemade pizza

22.) Recipe from a new cook book

23.) Deliciously Ella recipe 

24.) Breakfast on the go

25.) Macarons

26.) Cupcakes

27.) Avocado on toast

28.) Poached eggs on toast

29.) Brunch with the girls

30.) Doughnuts


Beauty posts

1.) FOTD

2.) Beauty haul

3.) Favourite makeup item of the week

4.) MAC lipstick collection

5.) Lipstick swatches

6.) Brush collection

7.) Morning skincare routine

8.) Evening skincare routine

9.) Face mask time!

10.) New haircut

11.) Manicure

12.) Product of the week

13.) Everyday makeup

14.) Dutch/French braids

15.) Disney character inspired makeup

16.) Contour palette

17.) LUSH bath

18.) Favourite hair products

19.) Makeup bag

20.) New beauty release

21.) Favourite perfume

22.) Debenhams/House of Fraser/Selfridges beauty counter

23.) Moisturiser collection

24.) Andddd pout!

25.) High end makeup collection

26.) Drugstore makeup collection


Lifestyle posts

1.) Flowers

2.) Your favourite plant

3.) Tea in your favourite mug

4.) Current setup

5.) Stationary haul

6.) QOTD

7.) Your pet

8.) Blogger of the week

9.) Pretty landscape

10.) Inspirational graffiti

11.) Colourful houses

12.) Pretty notebooks

13.) Favourite candle

14.) Holiday snaps

15.) Yoga poses

16.) Gym selfie

17.) Polaroids

18.) Pretty bedspread

19.) Starbucks cup

20.) Magazine pile

21.) Your desk space

22.) Old buildings

23.) Afternoon tea

24.) Currently reading

25.) Sunset

26.) WCW

27.) Bullet journal

28.) Cactus


Fashion posts

1.) OOTD

2.) What I wore

3.) Layout of outfit plan

4.) New shoes

5.) Festival-inspired outfit

6.) Disney-inspired outfit

7.) Bikini time!

8.) Fashion wishlist

9.) '90s choker and sunnies combo

10.) Gym gear

11.) New bag

12.) Favourite accessories

13.) Floppy hat selfie

14.) Watch closeup

15.) Slogan tee

16.) Novelty socks


What would you add?

31 January 2016

Coconut Cups | The Perfectly Instagram-able Snack


I'm not going to lie, I've become a pretty hardcore Instagram addict recently. Nowadays you'll find me scouring the home ware sections of stores, hunting down the perfect Instagram photo prop or spending so long making the prettiest food picture that it will likely go cold before I manage to eat it. BUT I love it - it's my favourite app and I love putting effort into making it look awesome and letting my creative side out.
Making these coconut snack cups has been on my Insta bucket list for what seems like forever - all the awesome food bloggers seem to have done it and I wanted to too! It is the simplest (and cheapest!) way to make the awesomest of Instagram posts. All you do is get a coconut and your favourite fruit, or hummus, other dips, ice cream, smoothie, etc. You crack the coconut in half, fill it with your favourite goodies, find a pretty background and take a snap *insert camera emoji here*.
What's your favourite awesome Instagram post cheat? 

30 December 2015

Hello New Year | 2016 Blogging Goals


I figured I'd round off the year with a selection of my favourite pictures from this years' posts. I've loved my year of blogging, and it's brought me so many opportunities, which is why I'm looking forward to it simply getting bigger and better in 2016. I'm sure all us bloggers around about now are thinking about what we hope will happen for us and our blogs in the coming year, so I thought I'd start a discussion with you all about our dreams.
What do I want? Well, my main goal for this year is to effectively monetize my blog (in boring terms), aka I'd love to be able to go part time, with my blog making up the rest of my monthly paycheck. This would mean I could put more time into blog, pay more attention to my fitness, and spend more time with the little fluffs - Ted the bunny and Hammy & Jeff the dwarf hamsters. Plus, I could take even prettier photos to share with you all in my posts (hello extra daylight hours!)
I would love to work with more brands in the coming year, especially beauty ones. Nourish ME is all about caring for yourself and I really love letting people know about new products that will help you nourish yourself, whether it be mentally or physically. 
Finally, at the moment instagram is my most successful social media platform. I'd love to get to 5k followers in the next year (as I'm just over 1k at the moment). My twitter would ideally hit 1000 and my bloglovin and Facebook page at least 500. 
What are your blogging goals in the coming year?